DNS launch access
Give Studio Ledger secure access to help launch your site.
Use the guide below to invite us into your domain provider without sending passwords. We only need access long enough to update the DNS records for your new website.
Invite email
hello@studioledger.io
Use this email when your domain provider asks who should receive access.
Provider instructions
Choose your domain provider.
Open the section that matches where you bought your domain. The provider names and labels may change slightly over time, so each section links back to the official source documentation.
GoDaddyDelegate AccessBest when your domain is registered at GoDaddy and we need to update DNS records.
Best when your domain is registered at GoDaddy and we need to update DNS records.
Recommended access
Domains Only, or Products & Domains if Domains Only is not enough for your account.
- 1
Sign in to GoDaddy and open the Delegate Access page.
- 2
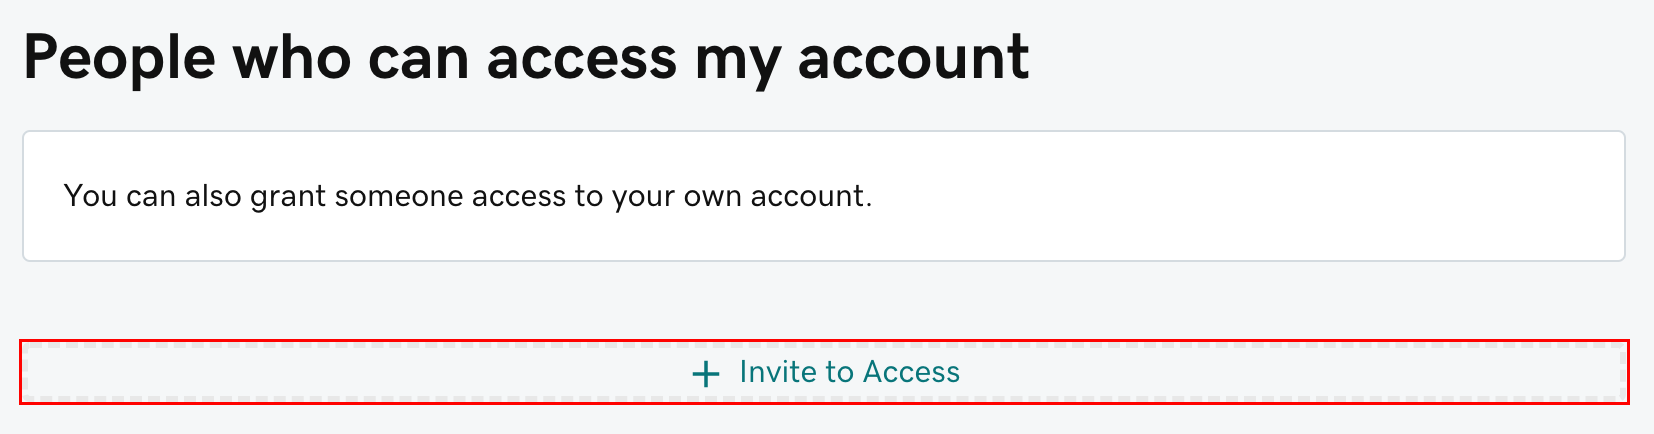
Under People who can access my account, choose Invite to Access.
- 3
Enter Studio Ledger as the name and hello@studioledger.io as the email address.
- 4
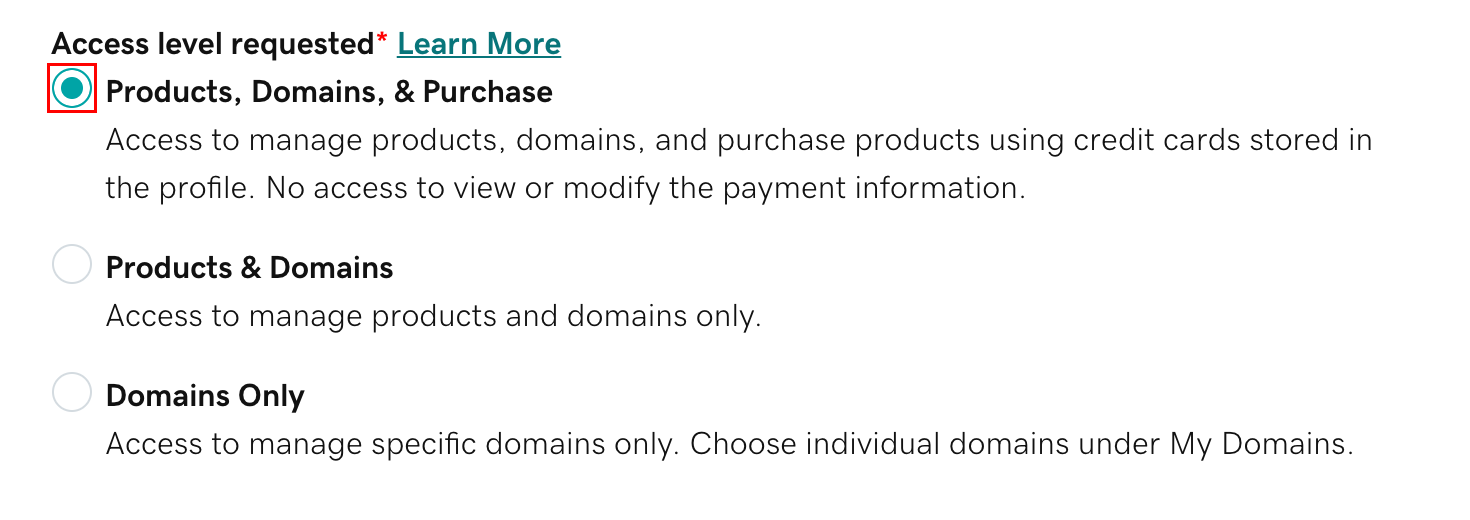
Choose an access level that allows domain/DNS management. For most launches, Domains Only is preferred.
- 5
Select Invite. GoDaddy will email Studio Ledger an invitation.
- 6
If GoDaddy asks you to set domain folder permissions after we accept, allow management actions for the domain we are launching.
Official walkthrough screenshots
NamecheapShare AccessBest when we only need DNS access for a specific domain in your Namecheap account.
Best when we only need DNS access for a specific domain in your Namecheap account.
Recommended access
Share access to the domain with Advanced DNS / host record permissions.
- 1
Sign in to Namecheap.
- 2
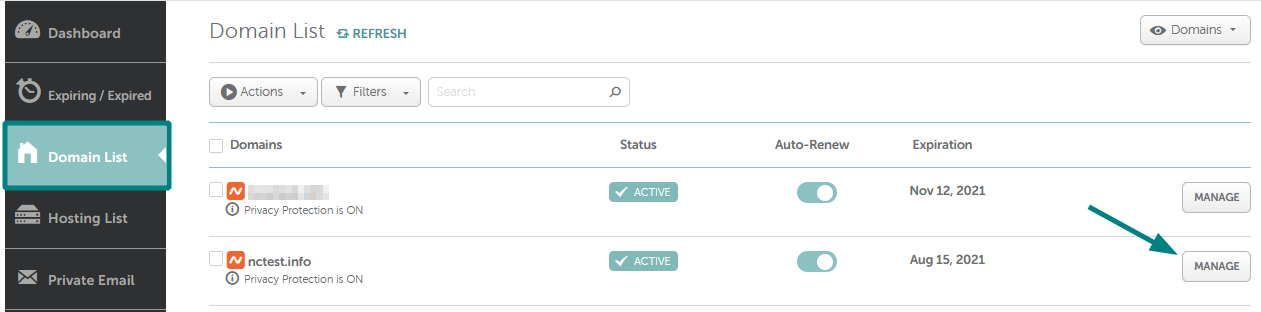
Go to Domain List from the left sidebar.
- 3
Find the domain we are launching and select Manage.
- 4
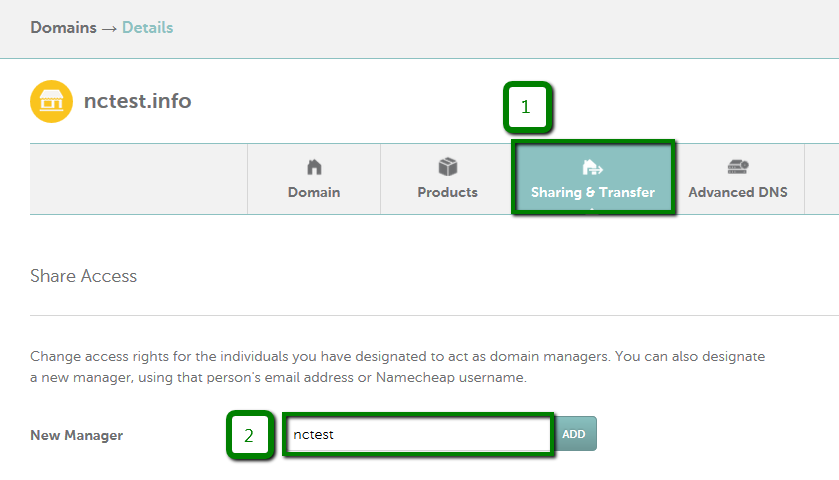
Open the Sharing & Transfer tab.
- 5
In Share Access, enter hello@studioledger.io or the Studio Ledger Namecheap username if we provide one.
- 6
Select permissions that allow DNS/host record management, then enter your Namecheap password to confirm.
- 7
Send us a quick note after the invite is sent so we can accept it.
Official walkthrough screenshots
Domain.comAccounts & UsersBest when your Domain.com dashboard shows an Accounts & Users or Users & Roles area.
Best when your Domain.com dashboard shows an Accounts & Users or Users & Roles area.
Recommended access
Admin or Technical access, depending on what your account shows for DNS management.
- 1
Sign in to your Domain.com account.
- 2
Open the profile menu in the top-right corner.
- 3
Look for Accounts & Users, Users & Roles, or a similar account-access menu.
- 4
Choose the account that owns your domain, then select Manage if prompted.
- 5
Under User Roles & Permissions, choose + Add User.
- 6
Enter Studio Ledger as the name and hello@studioledger.io as the email address.
- 7
Choose a role that can manage products, services, and DNS records. If you are unsure, choose Technical first and contact Domain.com support if DNS is unavailable.
- 8
Send the invite and let us know it is on the way.
BluehostUsers & RolesBest when your domain or DNS is managed in Bluehost Account Manager.
Best when your domain or DNS is managed in Bluehost Account Manager.
Recommended access
Tech Contact if available; Admin Contact only if Tech does not expose DNS management.
- 1
Sign in to your Bluehost Portal.
- 2
Click your profile icon in the top-right corner.
- 3
Select Users & Roles.
- 4
Choose Manage for the account connected to your domain.
- 5
Scroll to User Roles & Permissions and select + Add User.
- 6
Enter Studio Ledger as the name and hello@studioledger.io as the email address.
- 7
Choose Tech Contact if the role allows domain/DNS management. Use Admin Contact only if Bluehost requires it for DNS.
- 8
Select Invite and tell us once it has been sent.
HostingerAccount SharingBest when your domain, DNS, or hosting is managed inside Hostinger hPanel.
Best when your domain, DNS, or hosting is managed inside Hostinger hPanel.
Recommended access
Manage services access for the domain/hosting service we are launching.
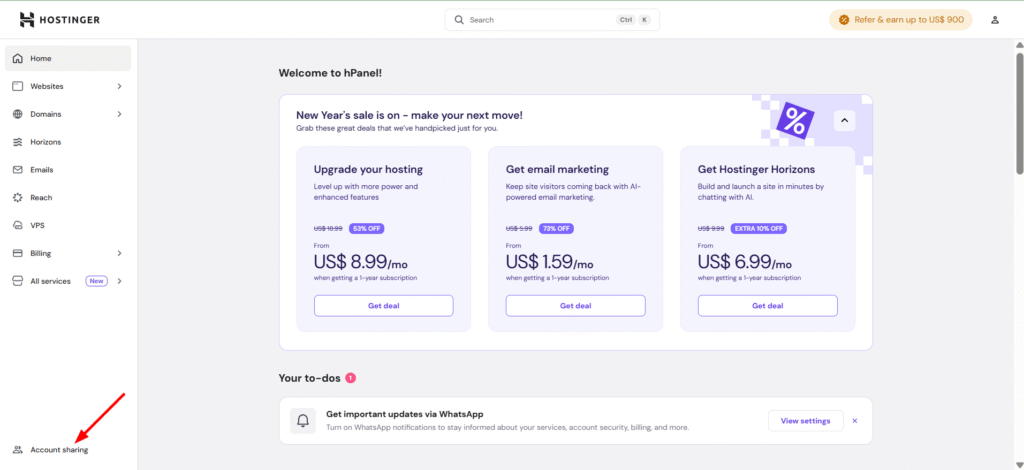
- 1
Sign in to Hostinger hPanel.
- 2
From the home page, open Account Sharing.
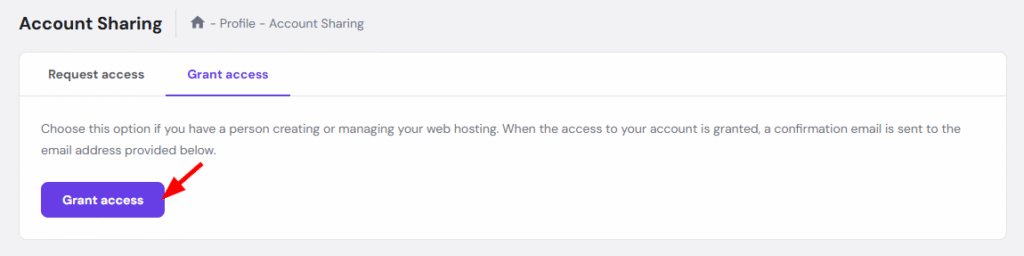
- 3
Select Grant Access.
- 4
Enter hello@studioledger.io as the user receiving access.
- 5
Choose the services connected to your domain and website launch.
- 6
Choose an access level that allows service/DNS management. Manage services is usually enough.
- 7
Select Grant Access. Hostinger will send us a confirmation email.
Official walkthrough screenshots
IONOSPartner AccessBest when your domain is inside IONOS and partner access is available for your account.
Best when your domain is inside IONOS and partner access is available for your account.
Recommended access
Partial access through the IONOS Agency Partner flow when available.
- 1
Sign in to your IONOS account.
- 2
Check whether your dashboard shows partner, agency, or access authorization options.
- 3
If Studio Ledger has sent a partner access request, open the IONOS notification or email.
- 4
Approve partial access if it allows us to manage the domain/DNS settings needed for launch.
- 5
If no partner-access option appears, contact IONOS support and ask how to grant a web partner temporary DNS access.
- 6
If IONOS cannot delegate access on your account, schedule a live DNS session with us. You stay logged in, and we guide the exact records to update.
Do It YourselfDNS RecordsIf you prefer not to delegate access, add these records in your domain provider’s DNS settings.
If you prefer not to delegate access, add these records in your domain provider’s DNS settings.
Open your provider’s DNS settings and add or update the records below. Remove any old conflicting records for @ or www first.
Some providers call @ the root domain, blank host, or apex record. Some providers may remove the final period from the CNAME value automatically; that is usually fine.
Name
@Value
216.150.1.1Connects the root domain, like yourfirm.com.
Name
wwwValue
58c427ca45750621.vercel-dns-016.com.Connects the www version, like www.yourfirm.com.
Keep your account secure.
Do not send passwords
Provider delegation keeps your login, billing, and 2FA under your control.
Use the minimum access needed
Domain/DNS or technical access is enough for most Studio Ledger launches.
Revoke access later
After launch, you can remove Studio Ledger from your provider’s users or access page.
Stuck? We can screen-share
If your provider does not support delegation, we can guide the DNS edits while you stay logged in.
Need help?
Send us a screenshot of your provider dashboard.
If you are unsure which provider owns your domain or which role to choose, email us a screenshot and we will point you to the safest option.